Monday, November 11, 2013

Slow Cooker Turkey Chili

Any yet again...another 2 weeks go by without a new post. So much for posting regularly. You can thank Sarah for this post who kindly mentioned that she was sick of signing into the blog and seeing brown sugar glazed kielbasa. In response to peer pressure, I decided to take a break from outlining and studying to get this new post up. 
This is a regular at our house especially since the cold weather has started. It's a super easy recipe. I can put all the ingredients in the slow cooker before class and come home to a ready meal. Another plus is that it usually lasts us two plus nights (making it a great recipe for those crazy busy weeks). I make this recipe with ground turkey to make it a healthy meal. It doesn't lack in flavor at all by doing so...even ask the boyfriend who is pro-beef.

Ingredients:
  • McCormick Slow Cooker Chili Seasoning Mix (found in the spice aisle)
  • 2 1bs of turkey
  • 2 (14-1/2 oz) cans of diced tomatoes, undrained
  • 2 cans kidney beans, drained and rinsed
  • 1 can tomato sauce
  • 1 large pepper, chopped
  • 1 large onion, chopped
  • your favorite toppings: shredded cheese, sour cream, chips
Recipe:
  • Ground turkey in a large skillet, drain fat
  • Place all ingredients in slow cooker. Stir until well mixed
  • Cook 8 hours on low, or 4 hours on high.

Friday, September 27, 2013

Kielbasa (Brown Sugar Glazed)

I found my new go-to party recipe thanks to Pinterest.
It makes the perfect appetizer..and a delicious one at that.
I could have eaten the entire batch myself. 
Oh..and did I mention its easy to put together!?!
Throw it in the crockpot, get the rest of your party together, and you're ready to go!
Ingredients:
  • 2 lbs. fully cooked kielbasa sausage, cut into 1" pieces
  • 1 cup brown sugar 
  • 1 cup  applesauce
  •  2 Tbsp. Dijon mustard 
  • 1-1/2 tbsp minced garlic

Recipe:
  • Combine the kielbasa with brown sugar, applesauce, garlic, and mustard in a crockpot.
  • Cover and cook on high for 2-3 hours until heated.


Monday, September 23, 2013

Crockpot Apple Crisp

I can't believe its been a month since my last post! I couldn't even remember my blog password.
 Oy vey. 
Lately, it seems like my days just turn into weeks which turn into months.
 It's crazy how time flies when things are busy!
I now have a month worth of recipes and pictures to share with you...which I'm hoping to get up soon! I am starting off my string of blog posts with the perfect fall recipe: apple crisp. I have been LOVING my crockpot lately. So I figured, why not? Lets try a dessert! I was a little worried that the topping of the apple crisp would turn out to be mushy from being cooked in the crockpot, but the texture was just fine! In fact, I liked the apple crisp a lot! It made the apartment smell FANTASTIC, and it got me in the mood for fall!! I just can't believe its almost October...eeks!
Recipe Source: The realistic nutritionist

Ingredients:
  • 6 cups chopped apples
  • 3/4 cup packed brown sugar
  • 1/4 cup white sugar
  • 3/4 cup flour
  • 1 tbsp corn starch
  • 1 tbsp apple butter
  • 4 1/2 tbsp regular butter
  • Dash of salt
  • 2 tbsp lemon juice
  • 1 tbsp cinnamon
  • 1/2 tbsp nutmeg
  • 1/2 tbsp allspice
  • Serve with vanilla ice cream
Recipe:
  • Place chopped apples, apple butter, and lemon juice in the crockpot. Stir to coat apples.
  • Mix together corn starch, 1/2 tbsp cinnamon, 1/4 tbsp nutmeg, 1/4 tbsp allspice, and white sugar in a separate bowl.
  • Pour dry mixture over apples and stir to combine.
  • In another bowl, mix flour, brown sugar, 1/2 tbsp cinnamon, 1/4 tbsp nutmeg, 1/4 tbsp allspice, and salt. 
  • Cut in butter using a fork until mixture is crumbly.
  • Sprinkle the topping over the apple mixture.
  • Cook on low for about 4 hours, until apples are soft. 

Friday, August 30, 2013

Steak and Cheese Subs

Dan and I have very different eating habits to say the least. 
Dan is a meatatarian and I'm well...anything but that...

Since we've moved in, Dan's had to suffer through more than enough "Lauren Meals"..so I decided to make a "Dan Meal." I think it turned out to be a success!

Even though I don't eat much steak, I'm a huge lover of steak and cheese subs.
I mean it is smothered in melted cheese after all...
You can't hate that!

Makes about 4 small subs

Ingredients:
  • 1/2 pound shaved steak
  • 1 small onion, diced
  • 1 green pepper, diced
  • 2 cloves garlic, minced
  • olive oil
  • 5 slices american cheese
  • small sub rolls
  • butter
Recipe:
  • In a pan, saute onion and peppers in olive oil
  • Add garlic to peppers and onion
  • Cook until tender
  • Remove veggies from pan
  • Add shaved steak and cook until browned
  • Drain excess grease from pan
  • Add veggies
  • Stir until combined
  • Add american cheese
  • Mix until well combined
  • In a separate pan, melt butter
  • Add sub rolls to pan and toast on each side until warm and buttery
  • Add steak mixture to sub rolls

Friday, August 23, 2013

Honey Fried Bananas

I found this recipe on pinterest and immediately wanted to try it. It just looked too darn good to pass up.
 I had some extra bananas left over so it was perfect!
 It was a decadent and easy sweet treat. 
Thank you Rachelschultz.com for the recipe!!

Ingredients:
  • 2 bananas
  • 2 tbsp honey
  • 1 tbsp water
  • olive oil
  • cinammon
Recipe:
  • cut the bananas into thick slices
  • drizzle olive oil in a pan
  • cook the bananas on medium heat (about 3-4 minutes on each side or until golden brown)
  • whisk honey and water together
  • pour honey over bananas
  • sprinkle cinnamon on top

Wednesday, August 21, 2013

Cheddar Beer Fondue. The Perfect Stay-At-Home Date!

Last weekend was our first weekend in our apartment and I wanted to do something special to celebrate! 
I decided to try a new fondue recipe for dinner. 
It was just like being at the melting pot but better!
Our first stay at home date was a success. I can't wait to do it again.
Now for the recipe...
The cheese fondue I decided to make was a beer cheddar fondue. The beer really adds a great flavor.

Fondue Recipe
Ingredients:
  • 1 1/2 cups beer (1 can)
  • 2 cloves of garlic, minced
  • 8 oz (1 package) of shredded mild cheddar cheese
  • 8 oz (1 package) of shredded sharp cheddar cheese
  • 2 tbsp cornstarch
  • 1 tsp dijon mustard
Recipe:
  • In a pot on the stove, combine the beer and garlic on medium heat until bubbles appear. 
  • Toss cheese with the cornstarch until evenly coated.
  • Add cheese a handful at a time to the pot, stirring until evenly combined
  • Stir in mustard.
  • Once ready to serve, pour cheese into fondue pot or other serving dish.
Dippers:
This is the fun part! Choose whatever dippers you like!
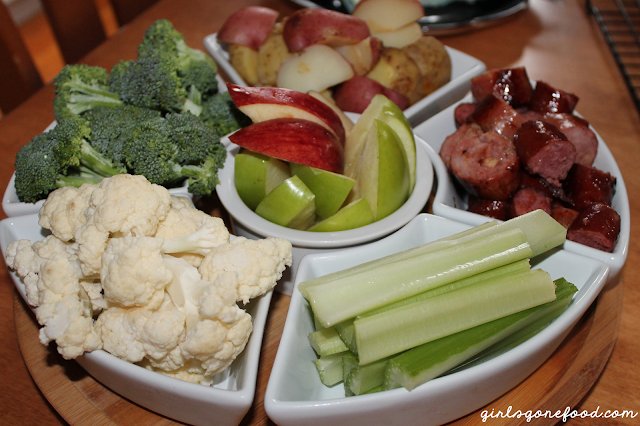
I chose potatoes, broccoli, cauliflower, apple, celery, sausage, bread, and pretzels!
The sausage and granny smith apples were my favorite dippers for this fondue. 


I also wanted something special for dessert!
Usually at the melting pot, we indulge in chocolate fondue for dessert.
I couldn't make another fondue because I only have one fondue pot...
I decided to make chocolate covered strawberries instead. They were yummo!
 It was almost like having chocolate fondue but less messy, and just as delish!!

Making chocolate covered strawberries is simple as can be!
 Take your favorite melting chocolate and melt in the microwave for 30 seconds at a time, stirring in between. Once the chocolate is melted, dip you strawberries in the chocolate and let harden in the fridge. 

Saturday, August 17, 2013

American Chop Suey

American chop suey is most definitely a comfort food of mine. It is also a favorite of the boyfriends, so I can imagine that this is going to be a regular dish at our house.

For those of you who are not familiar with american chop suey, it is basically just pasta with meat sauce. It is a really quick weeknight meal which makes it an easy go-to for me. 
I likes this dish because I usually always have pasta and tomato sauce in the cabinet, and I can always customize the rest of the dish. For instance, ground turkey or chicken can be used instead of beef.  You can also add whatever veggies you like in it. Plus, this meal takes no time to make.

This is just an overall awesome family dish.

Ingredients: 

  • 1 pound pasta (I used ziti, but you can use your favorite pasta)
  • 1 (24 oz) jar of tomato sauce
  • 1-1/2 pounds ground beef
  • 1 diced onion
  • Italian Seasoning (dried thyme, oregano, and basil)
  • salt/pepper
  • red pepper flakes
  • parmesan cheese for topping
Recipe:
  • Cook pasta according to package directions. I like to cook it al dente (a little hard) so that the pasta does not turn into mush when you add the meat sauce. To cook it al dente, just subtract a couple minutes from the cook time on the package. 
  • Add the diced onion and ground beef into a pan. Brown meat.
  • Drain excess fat from pan.
  • Season the meat with a few dashes of italian seasoning, salt, pepper, and red pepper flakes. 
  • Heat tomato sauce in a small sauce pan.
  • Combine pasta, meat mixture, and sauce in a pan.
  • Serve with parmesan cheese

Monday, August 12, 2013

Cheesy Beef Enchiladas

Let's be real...I think any food blogger strives to be The Pioneer Woman. I definitely drool reading her blog and watching her new tv show. Everything she cooks looks amazing!
 Unfortunately, she drowns pretty much everything with butter and oil so sometimes I need to tweek her recipes a little bit.  
These enchiladas are based off of one of recipes, but I cut out a few steps and ingredients to make it a little more user (and heart!) friendly. 
I thought my version of enchiladas were delicious, so I can only imagine how amazing her's taste.
 You can find the pioneer woman's beef enchiladas here.
 Ingredients:

  • 1 (28oz) can of enchilada sauce
  • 1 pound ground beef
  • 1 onion
  • 2 (4oz) cans diced green chilies
  • 3 large flour tortillas*
  • 3 cups mexican cheese
  • 1 cup chopped green onion
  • salt/pepper
*Note: I used large tortillas to make three giant enchiladas. If you are using small tortillas, you could probably make about 14/15 enchiladas.

 Recipe:

  • Heat enchilada sauce in a sauce pan. Once it is warm, let simmer.
  • While the sauce is heating, add chopped onions to a large skillet.
  • Once onions are tender, add ground beef and brown over medium-high heat.
  • Drain fat from pan.
  • Season beef with salt and pepper.
  • Preheat oven to 350 degrees.
  • Pour half of the enchilada sauce into a 9 by 13 inch baking dish. 
  • One at a time, dip each tortilla in the enchilada sauce remaining in the sauce pan. 
  • In the enchilada, place some beef mixture, cheese, chilies, and green onion.
  • Roll up tortilla and place in baking dish.
  • Once all tortillas are made, pour remaining enchilada sauce over the enchiladas.
  • Sprinkle remaining cheese, chilies, and green onions on top.
  • Bake for 20 minutes.

Monday, August 5, 2013

White Wine Berry Sangria

This weekend was absolutely crazy and amazing at the same time. We finally moved into our new apartment, had a fabulous weekend getaway, AND celebrated my birthday.
My moving/weekend/birthday recap is coming but I wanted to make sure I got this recipe up for Tasty Tuesday! 
This was the official drink of the weekend and it is a new favorite of mine!
Forgive me, we were on vacation and didn't measure things out...so this recipe is just an estimate.
I don't think you can mess the recipe up so just go with it!
If you like sangria sweeter...add more sprite...
If you don't have blueberries or strawberries..add whichever fruit is in your fridge!
Enjoying this on a roof deck by the water is optional but I would most DEFINITELY suggest it!
Recipe:
  • 2 (1.5L) bottles of pinot grigio 
  • 2 cans of sprite
  • 3-4 cups sliced strawberries
  • 2 cups blueberries
Ingredients:
  • Just mix it all together! Easy peasy!! 
Link up below for Tasty Tuesday!

Monday, July 29, 2013

Girls Night Martini

Hot pink just makes me happy.
Martinis make me ecstatic.
So you can just imagine how I feel about a hot pink martini. 
Beer is awesome, but sometimes I need a girly drink.
My go to drink is always vodka soda, but it looks a tad boring...like water.
 So I dressed it up a little bit to make this drink for girls night.
Ingredients:
  • Raspberry Vodka
  • Raspberry Seltzer
  • Grenadine
  • Lime Juice
  • Pink Sugar
Recipe:
  • Dip the rim of a martini glass in lime juice, then dip the rim in pink sugar. 
  • Add ice to a shaker. To make one martini, add 1 shot and a splash of vodka, add 3 to 4 ounces of seltzer, and a splash of grenadine.
  • Shake ingredients together.
  • Pour in martini glass. 

Monday, July 22, 2013

Bacon Wrapped Tater Tots

Today I was looking through my pictures and came across the one below.
 I made this appetizer months ago and it was a huge hit. I can't believe that I forgot to post it.
It's nothing fancy....
(the original recipe doesn't call it "tasty trashy taters" for nothing..)
It's not healthy...
(it's fried, oozing with cheese, AND wrapped with bacon and sugar...)
But it sure does taste good thanks to the salty bacon and sweet brown sugar! 
In my opinion salty and sweet is the best combo.
This would be PERFECT for the next time the man in your life invites all his buddies over.
Not to be sexist, but this just screams man food for me.
It's probably because my boyfriend loves anything that is wrapped in bacon haha. 
I'll certainly be saving this recipe for football season.
Football, beer, and trashy taters...
Sounds good to me!

Recipe Source: The Chew
Ingredients:
  • 1/2 bag tater tots (thaw to room temperature)
  • 8 ounces sharp cheddar cheese (cut into tiny blocks-about 1/4 inch)
  • frank's hot sauce
  • 16 ounces of bacon strips (cut strips in half)
  • 1/2 cup brown sugar
Recipe:
  • Preheat oven to 375 degrees.
  • Line a cookie sheet with foil.
  • Create an assembly line to make the tater tots:
  • First, cut a small whole in the tater and place a cube of cheese in the opening.
  • Dash tater with hot sauce. 
  • Wrap the tater with bacon and secure with a toothpick.
  •  Roll the bacon bundle in brown sugar. 
  • Place on baking sheet. 
  • Repeat with each tater.
  • Bake for 10 minutes. 
  • Flip tater tots over and bake for a remaining 5-10 minutes.
On another note, this is my first week co-hosting Tasty Tuesdays over at Anyonita Nibbles.
Link up below!


Tuesday, July 16, 2013

Beer Cake

I am the first to admit that pinterest is a HUGE source of inspiration for me. In many ways this blog is a product of my pinterest obsession. I found so many other blogs through pinterest that I was inspired to make my own! Today's post is just one of MANY examples of some fabulous ideas I get from pinterest.

I know we have all seen beer cakes on pinterest. I decided to try it out for a friend's 21st birthday. Since it is still July, I took advantage of the patriotic Buds still in stores. I just loved their colors! To match the theme I found star ribbon at the craft store.

I just love how it turned out! It is a really festive, unique, and practical gift...especially for a birthday or any type of celebration!!

The only negative is that this cake is VERY heavy and hard to transport. I would suggest putting it together on site. Lets just say it doesn't travel well in the car and you may have to rebuild once you arrive at your destination. That may or may not be from personal experience.... 

Read below to find out how I made this cake.

Also, here are some other 21st birthday gift ideas or "man gifts," as I like to call it, from my blog: 21st Birthday Celebration
 
You can follow me on pinterest here to see all the things that inspire me!

BEER CAKE DIRECTIONS
Items Needed:
  • 36 beer cans
  • Decorative ribbon
  • Cake circles (14", 8", and 6")
  • Tape
  • Scissors
Directions:
  • Step 1: For the bottom layer, stack four 14" cake circles. Place about 18 beer cans on top of the cake circles. Place close attention to the outside beer cans making sure the logo is facing outward. Note: you won't have enough beer to fill the circle completely. Wrap your favorite ribbon around the outside of the beer cans. Tape the ribbon in the back
  • Step 2: To make the middle layer, stack four 8" cake circles. Place about 10 beer cans on top. Repeat the rest of directions in step 1.
  • Step 3: For the top layer, stack four 6" cake circles and place about 7 beer cans on top. Repeat the rest of directions in step 1.
  • Stack 4: Stack each layer on top of one another.
  • Stack 5: Place a final beer can and ribbon on top.

Thursday, July 4, 2013

The Bloglovin' Collective


Welcome to the weekly Bloglovin' Collective party! 
There are many out there like it, but this is the Bloglovin' blog hop you do not want to miss.

Not sure if this is the blog hop for you? Check out what other bloggers have to say:

"I'm having so so so much fun with this blog hop, it's seriously the best one I've been involved with.  I've met some seriously awesome new bloggers, and there is so much HOPPING going on which totally doesn't always happen!"
-Ashley, Modernette


Host:

and my co-hosts for the week:

Carly @ Happy Little Kiwi
Mercedes @ Project ProcrastiNOT
Lauren @ Girls Gone Food
Ashley @ Modernette

Saturday, June 29, 2013

Irish Whiskey Cake

I've always been a fan of boozy cakes.
Margarita cakes...FABULOUS. 
Irish car bomb cupcakes...YUM
Cosmopolitan cupcakes...on my to do list. 
Beer cupcakes...not my favorite....that is one boozy cake I would not recommend. 

This cake is unlike any boozy dessert you have tried.
It is literally toxic.
Usually when you make a boozy dessert, the alcohol cooks out when you bake it.
You still get the flavor without getting tipsy. 
Well, this cake is different.
You CAN get drunk off this cake. 
I used more than half of a Jameson bottle in this cake.
Needless to say, there is no way that amount of alcohol can cook out of it.

You should definitely keep this recipe for St. Patrick's Day..
or your boyfriend/husband's birthday
...or a Tuesday night.
Whatever floats your boat. I won't judge.

Recipe Source: Washington Post

Ingredients: 
Cake
  • 1 package yellow cake mix
  • 2 small vanilla pudding mixes
  • 1/2 cup whole milk
  • 1/2 cup corn oil
  • 1 cup Irish Whiskey
  • 4 large eggs, beaten
Glaze
  • 4 oz (1 stick) unsalted butter. 
  • 1 cup powdered sugar
  • 1/2 cup Irish whiskey
  • 1 tbsp water
Recipe:
  • Preheat oven to 325 degrees.
  • Lightly grease a springform pan.
  • Combine the cake and pudding mixes in a small bowl.
  • In a separate bowl, combine the milk, oil and whiskey. 
  • Beat the wet ingredients together using a mixer.
  • Add the dry ingredients to the wet ingredients and beat until smooth.
  • Add the beaten eggs to the mixture. Mix until well combined
  • Beat mixture for an addition 2 minutes until thickened.
  • Pour mixture into prepared pan.
  • Bake for 50-60 minutes. Toward the end of baking, check the cake every few minutes to make sure it doesn't burn! You can test if its cooked by inserting a toothpick in the center of the cake. If the toothpick comes out clean, you're good to go. 
  • For the glaze, melt butter.
  • Add the sugar, whiskey and water to the butter.
  • Stir until sugar has dissolved.
  • Pour 1/2 of the glaze over hot cake in pan.
  • When cake is cool, remove the sides of the springform pan and pour over remaining glaze.
  • Note: you may want to eyeball how much glaze to put on the cake. I didn't use all of the glaze because the cake looked like it was getting too wet. 

Wednesday, June 26, 2013

Beach Essentials

Every summer I have a set of essentials that I bring/wear to the beach.
Since summer has finally arrived, I decided it would be a perfect time to share with you some of my beach favorites.
 I've tried to pick out some basic/neutral items that could be worn with any bathing suit or cover up.

While I don't like to wear all my jewelry to the beach, I do like to at least wear earrings. These Tory Burch earrings are simple enough to be worn to the beach, but will still make a statement.
I love the white and gold together.
Earrings

The gold earrings will match perfectly with this Tory Burch tote! How pretty is it?!
Right now its on sale too!

Tote

I already have these Jcrew flip flops and wear them almost every day.
I love how nautical they are! They are perfect for the beach.
Flip-Flops

I ALWAYS bring sunglasses and a hat to the beach to protect myself from the sun.
I picked out this vineyard vines hat in navy blue to match my sandals of course!
Hat

I'm currently saving up for these Rayban sunglasses.
These sunglasses are definitely number one on my wish list right now.
I just love the tortoise frame!
Sunglasses

How could you go wrong with a monogrammed drink cup? You can find this cup as well as other fabulous monogrammed items at Etsy.
Cup

A colorful beach towel is a no brainer!
Vera Bradley's patterns make beautiful beach towels.
Beach Towel

I usually don't wear much makeup to the beach...maybe just a little concealer and waterproof mascara.
I do LOVE sugar lip balm though.
It will keep your lips so smooth despite all the sand and salt that you are exposed to at the beach.
I love the sugar lip balm in rose because it also gives your lips a little color as well!
Just a side note, sugar lip balm melts VERY easily so if you are considering bringing it to the beach, I would keep it somewhere cool.
Lip balm

Finally, you have to have bright and colorful nails.
I'm obsessed with this color from Essie: In the Cab-Ana
And yes, sometimes I do pick out my nail polish just from the name.
Nail Polish

       
Related Posts Plugin for WordPress, Blogger...