Thursday, October 25, 2012

Butternut Squash Macaroni and Cheese

This may be my favorite recipe on this site. I know that is a pretty strong statement, but trust me on this! This mac and cheese is DELISH! I should probably add that I am a mac and cheese connoisseur so you can trust me on this. The butternut squash makes the mac and cheese especially creamy and gives it the best golden color. I most definitely will be making this again and again and again!

Recipe Source: Cooking Light


 Ingredients:
  • 3 cups cubed and peeled butternut squash
  • 1-1/4 cups fat free chicken broth
  • 1-1/2 cups fat free milk
  • 2 garlic cloves, peeled
  • 2 tablespoons plain fat free greek yogurt
  • 1 teaspoon salt
  • 1/2 teaspoon pepper
  • 1-1/4 cup shredded Gruyere cheese
  • 1 cup grated pecorino romano cheese
  • 1/4 cup grated parmiginao-reggiano
  • 1 pound uncooked cavatappi pasta
  • 1 teaspoon olive oil
  • 1/2 cup panko breadcrumbs
Recipe: 
  • Preheat oven to 375 degrees.
  • Combine squash, chicken broth, milk and garlic in a saucepan.
  • Bring this mixture to a boil over medium-high heat.
  • Reduce heat to medium and simmer until squash is tender. This will take about 25 minutes.
  • Remove from heat.
  • Place squash mixture in a blender. 
  • Add salt, pepper, and greek yogurt to the mixture.
  • Blend until smooth. (Be careful with this! Its hot!!)
  • Stir in gruyere cheese, pecorino romano cheese, and 2 tablespoons of the parmigiano reggiano cheese. Stir until combined.
  • Cook pasta according to directions.
  • Add pasta to squash mixture. Stir until combined.
  • Coat a baking dish (13 X 9) with cooking spray.
  • Pour in pasta/squash mixture into the dish. 
  • In a skillet over medium heat, heat oil. 
  • Add panko breadcrumbs to the oil and coo until colden brown. Stir in 2 tablespoons of parmigiano-reggiano cheese.
  • Sprinkle breadcrumbs over pasta mixture. 
  • Coat top of pasta dish with cooking spray.
  • Bake for 25 minutes until bubbly!!
Thursday, October 18, 2012

Double Chocolate Pumpkin Muffin

Ok so I obviously have been MIA lately. I have so much going on right now with school and everything. I just passed in 40 plus pages of midterm papers today and I am not even done!! I asked the fabulous Lyndi from the journey... to fill in for me this week. Lyndi and I met through foodie pen pals and have stayed in contact ever since. Her blog is adorable. Check it out if you can! She has some very yummy recipes posted!! - Lauren

Hey y’all! I’m Lyndi from The Journey and I am thrilled to be a guest here today on Girls Gone Food! I’ve got a yummy fall recipe to share with you. Fall is officially here, and it is my very favorite time of the year! I love the changing of the trees, pumpkin flavored things, cooler weather, football, scarves, boots, and I could go on… I just love this time of the year! One of my favorite things about fall is pumpkin flavored treats. I love cooking with pumpkin this time of the year, especially when it comes to baking. This recipe I’ve used for a few years after hearing about it at a weight watchers meeting. I have tried it with different combinations, and this one is the best. (in my opinion) These chocolate muffins are a great guilt free treat, but they also make a great breakfast when paired with milk. However you enjoy them, they’re the perfect fall combination for the chocolate lover!  

ingredients.
·         1 box super moist chocolate cake mix
·         1 can pumpkin
·         ½ cup mini chocolate chips

directions.
1.       Combine cake mix, pumpkin and chocolate chips in mixing bowl.
2.       Stir together with electric mixer for 2-3 minutes until everything is mixed together.
3.       If using liners, place liners in muffin tin.
4.       Preheat oven to 350.
5.       Scoop about 1-2 tablespoons of mixture into each muffin tin hole.
6.       Bake for 18-20 minutes.
7.       Let cool, and ENJOY!

*makes 12-24 muffins depending on how full you fill the muffin tin holes.

Monday, October 8, 2012

Baked Jalapeno Poppers

I love game day! Don't fool yourself, its not because I'm a huge football fan. I love game day because of the food....that's really it. Ok...and the beer too....and hanging out with friends. Really, I like everything about game day except the game...hahah.  I'm one of those people that pretend to like sports, but have no idea of whats going on. For example, yesterday I was trying to prove to my brother that I liked football and I told him that touchdowns were 12 points. He laughed at me. For those of you who are as football stupid as me..touchdowns are actually 6 points...oops.

Whether you are a football fan or not, here is an amazing and easy recipe for jalopeno poppers. They are delicious! The best part is that there is no messy breading involved. All you have to do is throw them in the oven and bake them. Stuffing the peppers can be a little tedious, so you can even stuff the peppers a day before the game.

Recipe Source: Kraft Recipes

Ingredients:
  • 18 fresh jalapenos (the recipe will actually make 36 jalapeno poppers because you'll be cutting the jalapenos in half)
  • 4 oz cream cheese
  • 1 cup shredded cheddar cheese
  • 4 slices bacon, cooked and crumbled
  • 2 tbsp finely chopped onion
  • 2 tbsp finely chopped cilantro
Recipe:
  • Heat oven to 375 degrees.
  • Cut jalopenos in half, and remove all the seeds and veins. This is where all the heat is so make sure you clean them out really well.
  • Combine cream cheese, cheddar cheese, bacon, onion, and cilantro.
  • Spray a baking sheet with non stick cooking spray.
  • Stuff each jalopeno with the cream cheese mixture and place on baking sheet.
  • Bake for 10 mins.


Tuesday, September 25, 2012

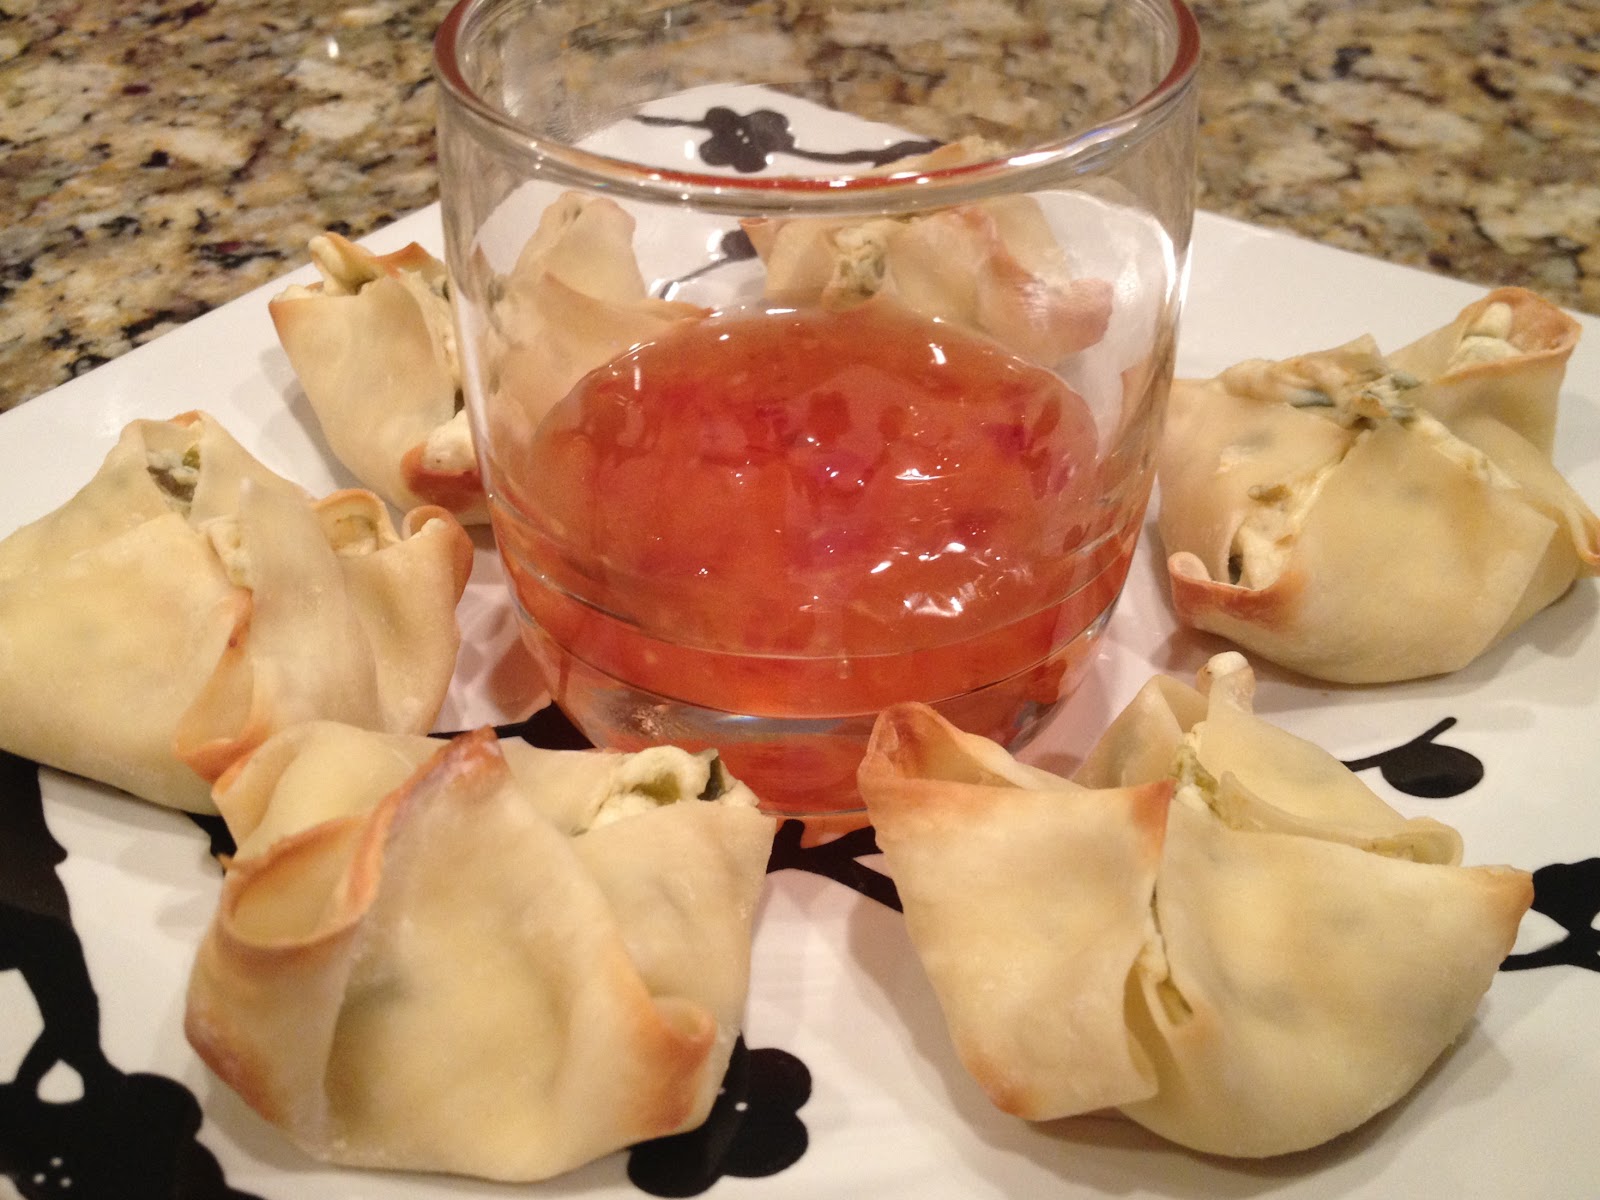
Jalopeno Popper Wonton Pockets

Today was one of those days where I was craving food ALL DAY LONG. Its probably because I spent most of the day on pinterest. Note to self: Pinterest is always a bad idea when you're hungry.

I found the following recipe and altered it a little bit to make it more like a jalopeno popper pocket. It's delicious!! In the near future, I think I may try the same technique and make homemade crab rangoons with it.

This recipe makes 8 wontons.

Recipe Source: Heart Mind & Seoul

Ingredients:
  • 4 ounces light cream cheese
  • 2 tbsp chopped canned jalapeno pepper
  • pinch of paprika
  • 8 wonton wrappers 
  • non-stick cooking spray
  • sweet chili sauce
Recipe:
  • Preheat oven to 400 degrees
  • Mix together cream cheese, chopped jalapeno pepper, and paprika 
  • Spray a cupcake tin with non stick cooking spray
  • Press a wonton wrapper into the bottom of each cup
  • Fill each wonton wrapper with a spoonful of cream cheese mixture
  • Fold wonton wrapper edges into the middle of the cup to create a pocket
  • Spray the top of each wonton pocket with non stick cooking spray
  • Bake for 10 minutes
  • Serve wonton pockets with sweet chili sauce


Sunday, September 23, 2012

Homemade Baked Mozzarella Sticks

Sometimes I surprise myself. I knew that these mozzarella sticks would probably be delicious but I had no idea they would be AMAZING. My mom said it was the best thing I had ever made...EVER. I honestly thought they were way better than any mozzarella sticks I've had at a restaurant. These mozarella sticks aren't even fried!! AKA you can eat twice as much.... Ok maybe not, but I still did haha.

Recipe Source: Skinny Taste

Ingredients:
  • 12 sticks mozzarella cheese sticks
  • 2 large eggs, beaten
  • 4 tbsp flour
  • 10 tbsp Italian seasoned breadcrumbs
  • 10 tbsp panko crumbs
  • 4 tsp parmesan cheese
  • 2 tbsp dried parsley
  • non stick cooking spray
  • tomato sauce
Recipe:
  • Cut all cheese sticks in half to make 24 pieces.
  • Place cheese in freezer. 
  • Place the beaten egg in one bowl, and the flour in a second bowl.
  • Combine italian breadcrumbs, panko crumbs, parmesan cheese, and dried parsley in a third bowl.
  • To make mozarella sticks, place each frozen cheese stick first in flour bowl, then in egg bowl, then in bread crumbs bowl. Repeat this process with all the cheese sticks. Once the cheese sticks are coated, place on a baking sheet with wax paper.
  • Note: You will have extra breadcrumbs, flour, and egg mixture left over. 
  • Place mozzarella sticks in freezer for about 20 minutes, or until frozen. 
  • When ready to bake, preheat oven to 400 degrees.
  • Spray a baking sheet with non stick cooking spray. Place frozen mozarella sticks on tray. Spray tops of mozarella sticks with cooking spray.
  • Bake for about 4 to 5 minutes. Flip mozzarella sticks and bake for an additional 4 to 5 minutes.
  • Serve with your favorite tomato sauce.

Saturday, September 8, 2012

Indian Food at Home

Last week, my mom and I were out running errands and we decided to grab some lunch. We were both craving indian food so we decided to travel across the city to our favorite indian restaurant.  We hardly ever get a chance to go have indian so we were pretty excited! We pulled up to the restaurant and it was closed for renovation....we were bummed!! There are other indian resturants around, but it just wouldn't be the same. So, we decided to prep an indian dinner ourselves. This certainly isn't authentic indian food, but I think its delicious and pretty easy!

We started the meal off with some appetizers. You can get these at trader joes. You just pop them in the oven for 10-15 minutes and you get these crispy and golden delicious apps!! The mini chicken tikka somosas are by far my favorite!!
For dinner we had chicken tikka masala and aloo gobi served with rice and naan. The naan was also from trader joes.
I neither created nor edited this recipe in any way, so it would not make much sense for me to post it here. If you would like to see the recipes visit skinnytaste.com.

Here are the links:
Chicken Tikka Marsala and Aloo Gobi.

Sunday, September 2, 2012

Pina Colada Cake

Yes, you caught me! Its been almost 2 weeks since my last post. I don't really know what I have been doing either....I guess just taking a break. School starts again on Thursday so I had to properly say goodbye to my summer. I have been doing some yummy cooking these past two weeks so I have tons of new recipes to share with you!

Today I'll be sharing the recipe for one of the most yummy cakes I have had in a while. I like to call it a pina colada cake as it consists of pineapple, coconut, and cream. Its the perfect cake to celebrate the end of the summer! It is also super easy to make. I got the recipe from Paula Deen. She likes to call it the better than sex cake. I guess you'll have to make the cake yourself to see if the cake lives up to its name.

Recipe Source: Paula Deen

Ingredients:
  • 1 box yellow cake, plus ingredients to prepare
  • 1 20 ounce can pineapple of juice
  • 3/4 cup sugar
  • 1 3.4 ounce box pudding, plus ingredients to prepare.
  • 1 8 oz container cool whip
  • 1 cup toasted coconut
Recipe:
  • Preheat oven to 350 degrees. Make yellow cake according to package.
  • While cake is baking, combine pineapple and sugar in a saucepan. Bring to a boil over medium heat, stirring constantly. Set to the side and let cool slightly. 
  • Remove cake from oven. Using a fork, pierce the cake all over. Pour the pineapple all over the cake.
  • Prepare pudding according to package. Spread pudding over cake. 
  • Spread cool whip over pudding and sprinkle with toasted coconut.
  • Chill cake in fridge.


Related Posts Plugin for WordPress, Blogger...